Secure your Application with WSO2 IS Python Auth SDK in 10 Minutes
We are happy to announce the release of the python Authentication SDK, for WSO2 Identity server (aka Product IS) which brings up the fast and secure way to add user login to a Python web applications with the help of the WSO2 Identity Server(WSO2 IS).
Currently the Python SDK supports only with the Flask framework and rest of the tutorial will be outlined based on securing a sample Python web Application built with the Flask framework.
The developer can approach the sample application in two ways. They could be able to download the sample app and then build the logic to that or else they could be able to integrate with their app. For both users this article has answers
This blog is structured into four sections.
- Create a Flask Web Application in Python
- Configuring the WSO2 Identity Server
- Configuring the web app using SDK
- Try it out and Secure it.

1. Create a Flask Web Application in Python
Sample application can be downloaded from our official Repository
The Common folder/file structure of Flask application will look like this. The Sample application we provide follows the same convention and would look similar to this.

app.py — contains the actual python code that will import the app and start the development server.
conf.py — stores configurations for your app.
static — contains static files i.e. CSS, Javascript, images
templates — this is where you store your html templates i.e. index.html, layout.html
requirements.txt — this is where you store your package dependancies, you can use pip
wso2.cert - WSO2 IS Certificate to avoid SSLCertVerificationError
Running the Application will serve the application through the default port which is `5000`.
- Before starting the application we need to add the IS configuration first .
- In order to get the IS config we need to configure the WSO2 IS.
- We need callback URL in order to register the application in the IS.
A callback URL is a URL in your application where WSO2 IS redirects the user after they have authenticated.
The URL for the sample application will be : https://localhost:5000/login - Let’s create a service provider in the WSO2 IS and Come back to the Application.
2. Configuring the WSO2 Identity Server
- Start the Identity Server and access the console app https://localhost:9443/console/
- Log in to the Identity Server using default administrator credentials (the username and password are both “admin”). or your tenant credentials
- In the Console App
New Application -> Web Application
And fill the details. Enter the name of the SP, callback URL and choose the OpenID Connect as the protocol
for an example:
Name: myclinic
callback URL: https://localhost:5000/login
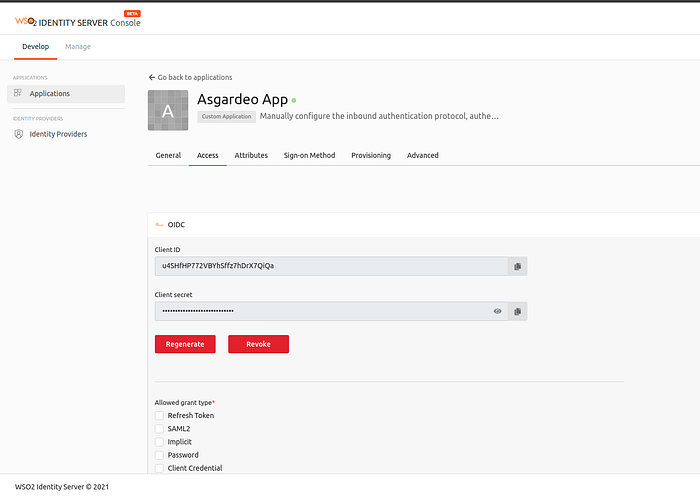
protocol: OpenID Connect - The created Service Provide(SP) will look like this in the WSO2 IS .

5. Get the Client ID and the Client Secret from the SP that you have created
3. Configuring the web app using SDK
Installing the dependencies
Inside the working directory of the sample application or your Flask application install the requirements (assuming your working environment has been already set up, if not follow this article which covers how to install pip and setting up the virtual environment) using the requirements.txt file. You can simply execute this command to install the dependencies. Please note that if you use pip then use the pip instead of pip3.
pip3 install -r requirements.txtIf you particularly want to install the python auth SDK then execute this command.
pip3 install asgardeo-auth-python-sdkAdd the Service Provider Configs
Inside the conf.py file fill the config object containing the necessary configurations.Below is the sample configuration for a SP registered under the tenant wso2.com
auth_config = {
    "login_callback_url": "https://localhost:5000/login",
    "logout_callback_url": "https://localhost:5000/signin",
    "client_host": "https://localhost:5000",
    "client_id": "u4SHfHP772VBYhSffz7hDrX7QiQa",
    "client_secret": "EU_tx0VLEfzTattupXFbeZqO3_0a",
    "server_origin": "https://localhost:9443",
    "tenant_path": "/t/wso2.com",
    "tenant": "wso2.com",
    "certificate_path": "samples/flask/cert/wso2.crt"
}
change the client_id, client_secret, tenant_path, tenant if you are configuring the sample application.
If you are adding the authentication to your application you may need to configure other values as well.
In this point, if you are using the sample application you could be able to try out the sample application. you can move to section 4 of this tutorial. For those configuring the custom application you may need to know more.
Initialize SDK
import the SDK and pass the authconfig dictionary
from asgardeo_auth.Integration.flask_client import FlaskAsgardeoAuth
from asgardeo_auth.exception.asgardeo_auth_error import \
    AsgardeoAuthError
from samples.flask.conf import auth_config# initialize the app
identity_auth = FlaskAsgardeoAuth(auth_config=auth_config)
Trigger Authentication and callback handling
/login endpoint handles both triggering the authentication and the callback handling according the the response returned from the function call identity_auth.sign_in()
@app.route('/login')
def login():
    """
    Login to implementation from asgardeo_auth_python_sdk.
    """
    response = identity_auth.sign_in()
    if REDIRECT in response:
        return redirect(response[REDIRECT])
    elif TOKEN_RESPONSE in response:
        credentials, authenticated_user = response[TOKEN_RESPONSE]
        return redirect(url_for('home'))
    else:
        raise AsgardeoAuthError(
            'Error occurred on the sign in Process Please Try again later')
Create a login.html file in a /templates folder. Add a link to the /login route.
<a href="{{ url_for('login') }}" class="btn primary" type="submit">Login</a>Check if the user is authenticated
Add the following decorator to your Flask application. Use it to decorate methods that require authentication.
def requires_auth(f):
    """
    Decorator to secure the protected endpoint which require user
    authentication.    Args:
        f : function to be decorated
    """    @wraps(f)
    def decorated(*args, **kwargs):
        """
        Decorator to redirect user to the dashboard.
        """
        if not identity_auth.is_session_data_available(USERNAME):
            return redirect(url_for('dashboard'))
        return f(*args, **kwargs)    return decorated
Show User Information
Add a / route to app.py that will render the user information stored in the Flask session. Decorate it with @requires_auth. It can be only accessed if the user has been authenticated. Like wise you can decorate any protected endpoint with the @requires_auth which requires authentication.
@app.route('/')
@requires_auth
def home():
    """
    Render the login page.
    """
    session_data = identity_auth.get_post_auth_session_data()
    return render_template('/dashboard.html', session_data=session_data)
Add a dashboard.html file in a /templates folder to display the user information. you can always modify the html in a way you want.
<div class="content">
    <h2>
        Hi {{ session_data.username }}
    </h2>
    <h3>Available user attributes</h3>
    {% if session_data.user %}
    <table>
        <tr>
            <th>User attribute name</th>
            <th>Value</th>
        </tr>
        {% for key, value in session_data.user.items() %}
        {% if value is not none %}
        <tr>
            <td>{{key}}</td>
            <td>{{value}}</td>
        </tr>
        {% endif %}
        {% endfor %}
        {% if session_data.access_token %}
        <tr>
            <td>access_token</td>
            <td>{{ session_data.access_token }}</td>
        </tr>
        {% endif %}
    </table>
    {% else %}
    <h3>There are no user attributes selected to the application at the
        moment.</h3>
    {% endif %}
</div>
Logout
To log the user out, you have to clear the data from the session, and redirect the user to the login endpoint back. all these functionality can be easily implanted using the function call identity_auth.sign_out()
@app.route('/logout')
def logout():
    """
    Logout implementation from asgardeo_auth_python_sdk.
    """
    return identity_auth.sign_out()
4. Try it out and Secure it.
- Run the web Application built with the Flask framework
- Go to https://localhost:5000 URL
you will see the page like this if you are using the sample app.
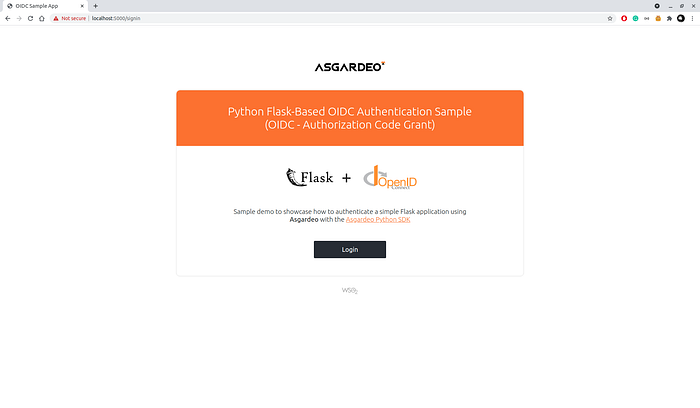
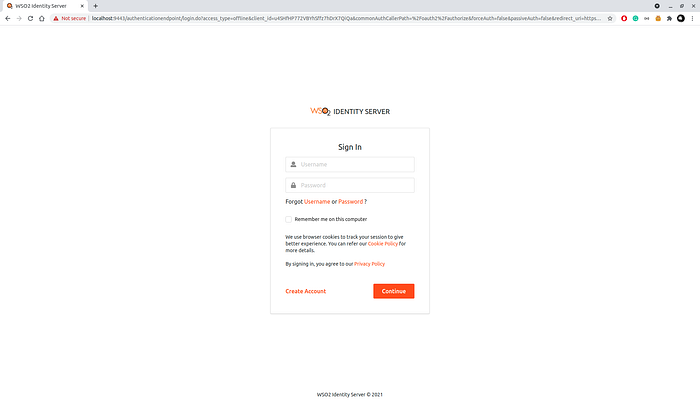
3. click the login, you will be redirected to WSO2 Identity Server’s login page. Enter the credentials there.
4. Once you logged in and approved the consent, you will be redirected back to https://localhost:5000 home page.
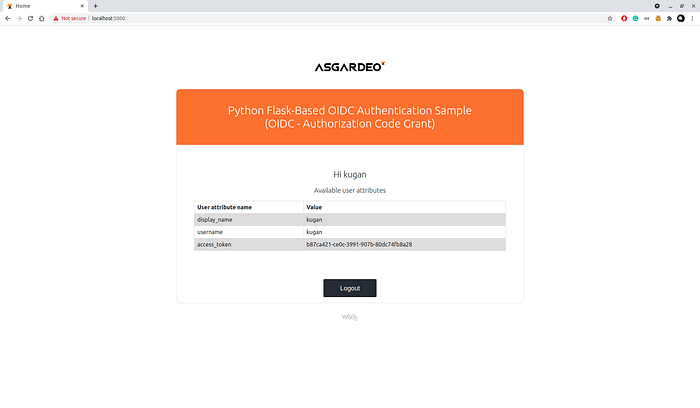
If you are reading this , Bravo! You have successfully finished the setup.
It Doesn’t End Here
If there are any issues that arise with the SDK while working with the new updates please file a ticket on the issues page.
In case you’re interested in contributing to the SDK you can always fork the repository and give us the PR. We always appreciate your effort. We are going to integrate other python web development frameworks such as Django, Pyramid, Tornado and more.
For any questions or support please feel free to reach out to us on the slack channel.
Happy coding!